
https://docs.unity3d.com/Manual/PostProcessingOverview.html
Unity - Manual: Post-processing and full-screen effects
Post-processing and full-screen effects Unity provides a number of post-processing effects and full-screen effects that can greatly improve the appearance of your application with little set-up time. You can use these effects to simulate physical cameraA c
docs.unity3d.com
Post Processing (후처리 작업)
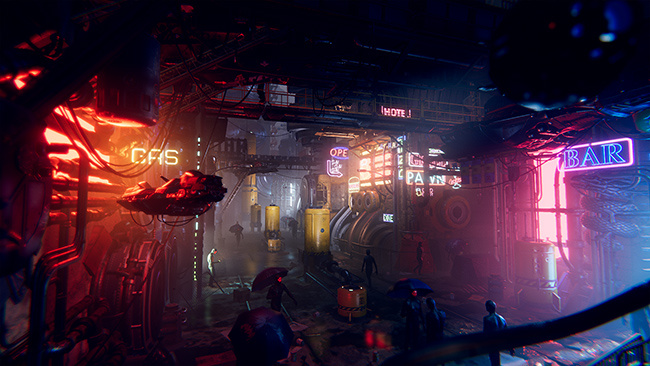
Post Processing은 게임의 시각적 품질을 향상시키기 위해서 카메라에 적용할 수 있는 효과 및 필터를 제공하는 기능입니다.
Post Processing은 후처리 작업이라는 기술을 사용하는데, 카메라가 영상을 내보내기 직전에 후처리 작업을 통해 다양한 효과와 필터를 적용하여 최종적으로 향상된 영상을 내보는 기술을 후처리 작업이라고 합니다.
| Scene without Post-Processing | Scene with Post-Processing |
 |
 |
Package 설치하기

[Window > Package Manager]를 클릭합니다.
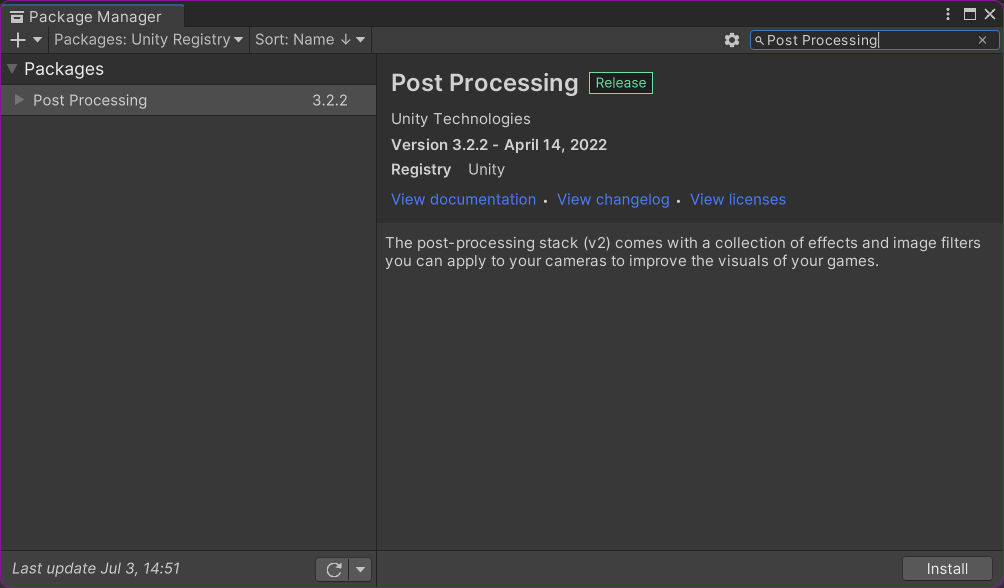
[Packages]를 Unity Resistry로 맞추고 [검색 창]에 Post Processing을 검색하여 Post Processing을 설치합니다.

Post Processing이 설치되면 [Component 목록]에 Post-process Component가 추가된 것을 확인할 수 있습니다.
기본 설정

[Inspector 창 > Layer > Add Layer...]을 선택합니다.

Post Processing을 적용할 User Layer를 추가합니다.

Post Processing을 적용할 [Camera Component]가 있는 오브젝트의 Layer를 설정했던 User Layer로 바꾸고 [Post-process Layer Component]와 [Post-process Volume Component]를 추가합니다.
[Post-process Layer Component]의 [Volume blending > Layer]를 해당 오브젝트의 Layer와 같은 것으로 변경합니다.

[Post-process Volume Component]에서 [Profile > New]를 선택하여 새로운 Post Process Profile을 만들고 위와 같이 설정합니다.
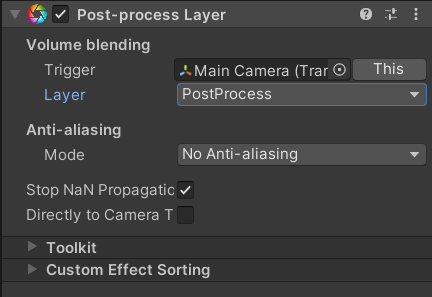
Post-process Layer Component
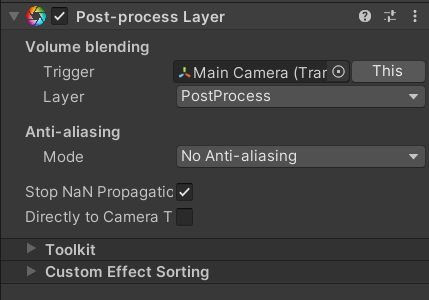
| Volume blending | Trigger | A transform that will act as a trigger for volume blending. (Volume blending의 트리거 역할을 하는 Transform입니다.) |
| Layer | This camera will only be affected by volumes in the selected scene-layers. (이 카메라는 해당 Layer의 Volume에 의해서만 영향을 받습니다.) |
|
| Anti-aliasing |
Mode |
This anti-aliasing method to use. (안티엘리어싱을 사용할 방법입니다.) |
| - FXAA is fast but low quality. (FXAA는 빠르지만 품질이 낮습니다.) - SMAA works well for non-HDR scenes. (SMAA는 HDR을 사용하지 않는 씬에서 잘 작동합니다.) - TAA is a bit slower but higher quality and works well with HDR. (TAA는 조금 느리지만 품질이 높고 HDR과 잘 작동합니다.) |
||
| Stop NaN Propagation | Automatically replace Nan/Inf in shaders by a black pixel to avoid breaking some effects. This will slightly affect performances and should only be used if you experience NaN issues that you can't fix. Has no effect on GLES2 platforms. (Nan/Inf 셰이더를 검은색 픽셀로 자동으로 대체하여 일부 효과를 방지합니다. 이는 성능에 약간 영향을 미치므로 수정할 수 없는 NaN 문제가 발생한 경우에만 사용해야 합니다. GLES2 플랫폼에는 영향을 미치지 않습니다.) (일반적으로는 사용하는 것이 더 좋습니다.) |
|
| Directly to Camera Target | Use the final blit to the camera render target for postprocessing. This has less overhead but breaks compatibility with legacy image effect that use OnRenderImage. (후처리 작업을 위해 카메라 렌더링 대상에 대한 최종 블릿을 사용합니다. 이는 오버헤드는 적지만 OnRenderImage를 사용하는 기존 이미지 효과와의 호환성은 손상됩니다.) |
|
Post-process Volume Component
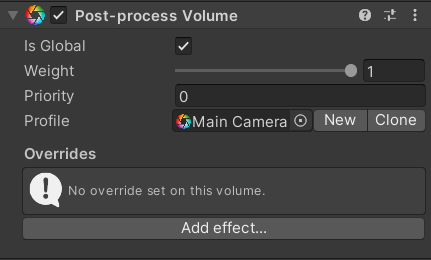
| IsGlobal | Check this box to mark this volume as global. This volume's profile will be applied to the whole Scene. (이 Volume의 Profile을 씬 전체에 적용하는 Global로 설정합니다.) |
| Weight | The total weight of this Volume in the Scene. (씬에서 Volume의 총 가중치입니다.) A value of 0 sigifies that it will have no effect, 1 signifies full effect. (값이 0이면 효과가 없음을 나타내고, 1은 최대 효과를 나타냅니다.) |
| Priority | The volume priority in the stack. A higher value means higher priority. Negative values are supported. (스택의 Volume 우선 순위입니다. 값이 클수록 우선순위가 높아집니다. 음수 값도 사용할 수 있습니다.) |
| Profile | A reference to profile asset. (사용할 Profile asset입니다.) |
| Overrides | 다양한 효과나 필터를 추가할 수 있습니다. |
기본 효과/필터
| Ambient Occlusion (앰비언트 오클루전) |
한 장면의 각 점이 앰비언트 라이팅(광원)에 얼마나 노출되어 있는지를 계산하기 위해 사용되는 셰이딩 및 렌더링 기법입니다. |
| Auto Exposure (자동 노출) |
이미지의 밝기 수준 범위에 따라 이미지의 노출을 동적으로 조정합니다. |
| Bloom (블룸) |
이미지의 밝은 영역의 경계에서 확장되는 광원을 생성합니다. |
| Chromatic Aberration (색 수차) |
카메라의 렌즈가 동일 지점으로 모든 색을 집중시키지 못한 경우 발생하는 효과입니다. |
| Color Grading (컬러 그레이딩) |
최종 이미지의 색과 명도를 변경하거나 교정하는 과정입니다. |
| Depth Of Field (피사계 심도) |
카메라 렌즈의 포커스 기능을 모방하는 효과입니다. |
| Grain (그레인) |
필름의 작은 파티클에 의해 발생하는 랜덤 광학 텍스처입니다. |
| Lens Distortion (렌즈 왜곡) |
카메라 렌즈의 왜곡을 모방하는 효과입니다. |
| Motion Blur (모션 블러) |
카메라에 의해 촬영되는 오브젝트가 카메라의 노출 시간보다 더 빠르게 움직일 때 이미지의 블러링을 모방하는 효과입니다. |
| Screen Space Reflections (스크린 공간 반사) |
스크린 공간 데이터를 재사용하여 반사를 계산하는 기법입니다. |
| Vignette (비네트) |
중심과 비교하여 이미지의 테두리를 향해 어두워지는 효과 또는 중심에 비해 채도를 줄이는 효과입니다. |